Interested in buying a reverse osmosis (RO) filter, or simply curious to learn how reverse osmosis works? Don’t invest in this costly system until you’ve read our complete guide.
Table of Contents
- 🤔 What is Reverse Osmosis?
- 📝 Reverse Osmosis Quick Highlights
- 💡 How Does a Reverse Osmosis System Work?
- ⚖️ Is a Reverse Osmosis System a Good Investment?
- 🔩 What Are The Components Of A Reverse Osmosis System?
- 🏡 Where are Reverse Osmosis Systems Installed?
- 🚫 Where Shouldn’t You Install RO Systems?
- 📈 What Affects the Performance of an RO System?
- 📑 Reverse Osmosis Water Requirements
- 💦 How Much Water Does Reverse Osmosis Waste?
- ☣️ What Does Reverse Osmosis Remove?
- 🆚 RO Water Vs Bottled Water
- 🪨 Do Reverse Osmosis Systems Remove Minerals from Water?
- 👍 Benefits of Reverse Osmosis Systems
- 👎 Setbacks of Reverse Osmosis Systems
- 👐 Are All Reverse Osmosis Filtration Systems the Same?
- 📅 How Long Do Reverse Osmosis Systems Last?
- ✔️ How to Find the Best Reverse Osmosis System
- 🙋♀️ Frequently Asked Questions
🤔 What is Reverse Osmosis?
Reverse osmosis is the most effective form of household water purification, and removes more than 99.9% of total dissolved solids from unfiltered water. If you’re looking for the cleanest, purest water, you’ll get it with reverse osmosis.
Some reverse osmosis filters, known as point of entry filters, are installed at your property’s main waterline, almost as soon as it enters your home. Others, known as point of use filters, are installed underneath your kitchen sink. Your water supply will feed into the reverse osmosis system, where it is filtered before being sent back into your waterline. Many RO filters also come with their own faucet to ensure no nasties are added to your water after purification.
📝 Reverse Osmosis Quick Highlights
Thousands of homeowners in the US now filter their water with reverse osmosis systems. Here’s why:
- Reverse osmosis water is healthy and pure
- Many reverse osmosis systems don’t need electricity
- Reverse osmosis filtration is completely automated
- Reverse osmosis is the cheaper, environmentally-friendly alternative to buying bottled water
💡 How Does a Reverse Osmosis System Work?
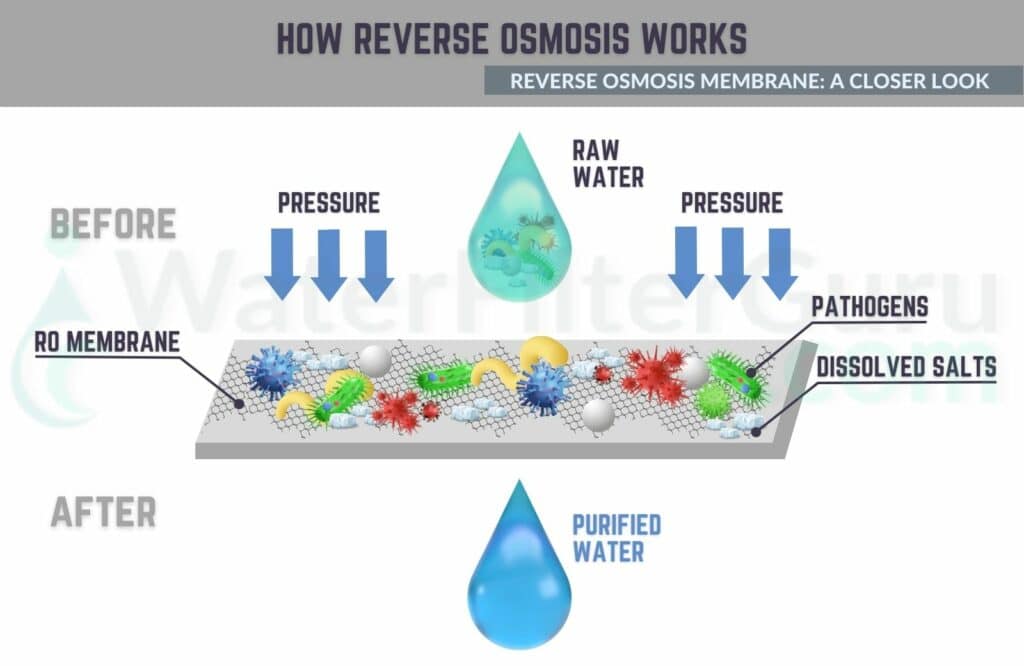
A reverse osmosis (RO) system typically consists of a series of filters and a semi-permeable membrane, which has small pores made from a thin film composite that traps dissolved solids. When you turn on your tap, water passes through the filters before being forced at a high pressure against the semi-permeable membrane at a constant rate. Water molecules are small enough to pass through the pores, and only clean water makes it out of the other side.
The impurities left in the RO chamber, known collectively as the RO concentrate, are sent straight down the drain, leaving only clean, pure drinking water.
The best RO filtering systems feed water through a number of varying filters and membranes for optimal results. Because not all contaminants are the same size, this helps to remove as many different types of impurities through a combination of filtration steps.
Reverse osmosis is so effective that it doesn’t only remove the harmful impurities from water – it also removes healthy minerals, like magnesium and calcium. A remineralization filtering cartridge can re-introduce these minerals into water after filtration, giving it a pleasant alkaline taste and boosting its health properties.
What Are the Stages of an RO System?
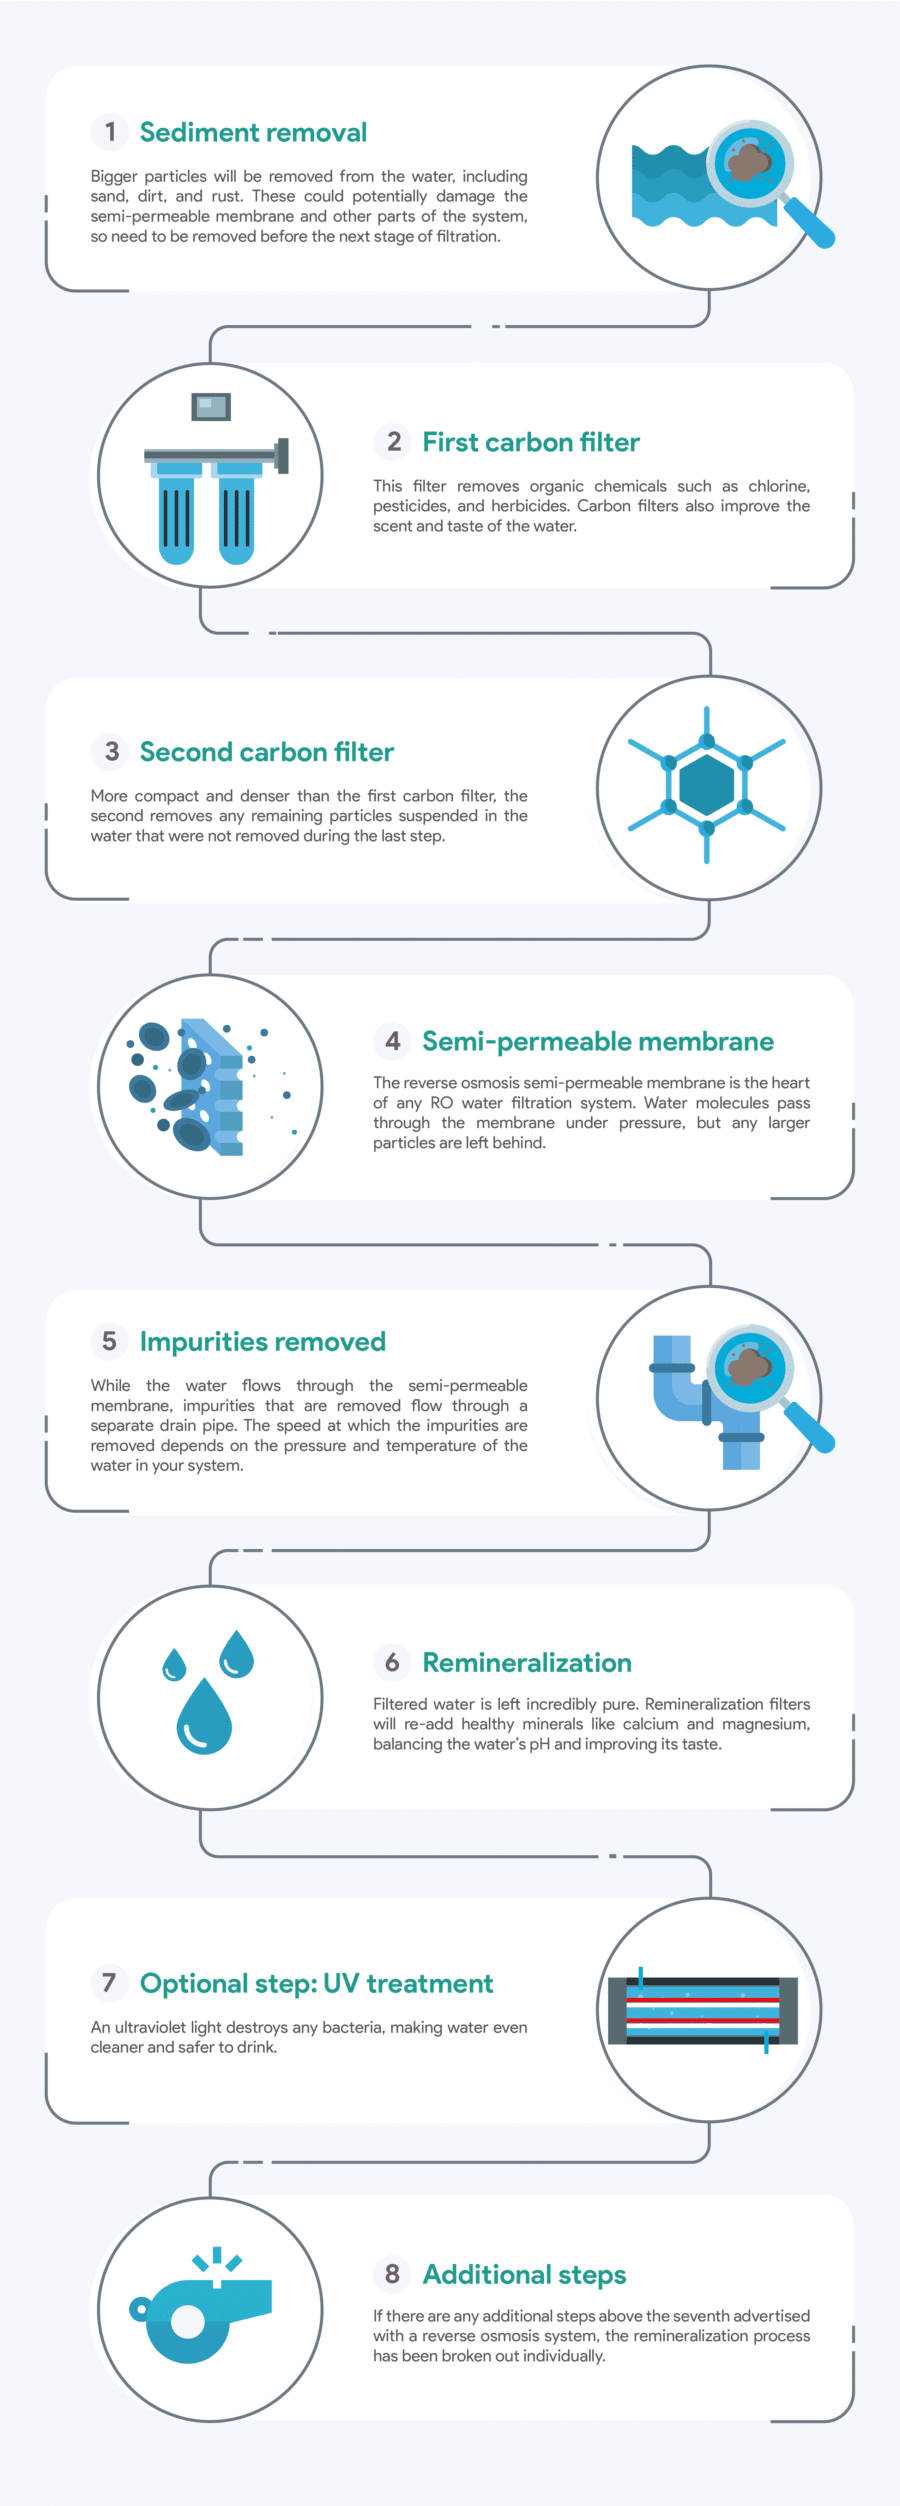
There are four common stages of all reverse osmosis systems: a sediment pre-filter, an activated carbon stage, the reverse osmosis membrane, and a post or polishing filter.
1. Sediment Pre-filter
Water contains a number of large sediment particles such as dust, rust, salt, and sand. Well contains a particularly high sediment content.
A reverse osmosis system feeds water through a sediment filter to remove these large particles, which could damage the later-stage filters or quickly clog them up. Most sediment filters can remove impurities as small as 5 microns.
2. Activated Carbon Filter
Because sediment pre-filters allow smaller impurities to pass through with water, the next-stage filtering cartridge in a reverse osmosis system needs to have smaller pores. Activated carbon filters, which are almost always a feature of a reverse osmosis system, have a pore size as small as 0.5 microns.
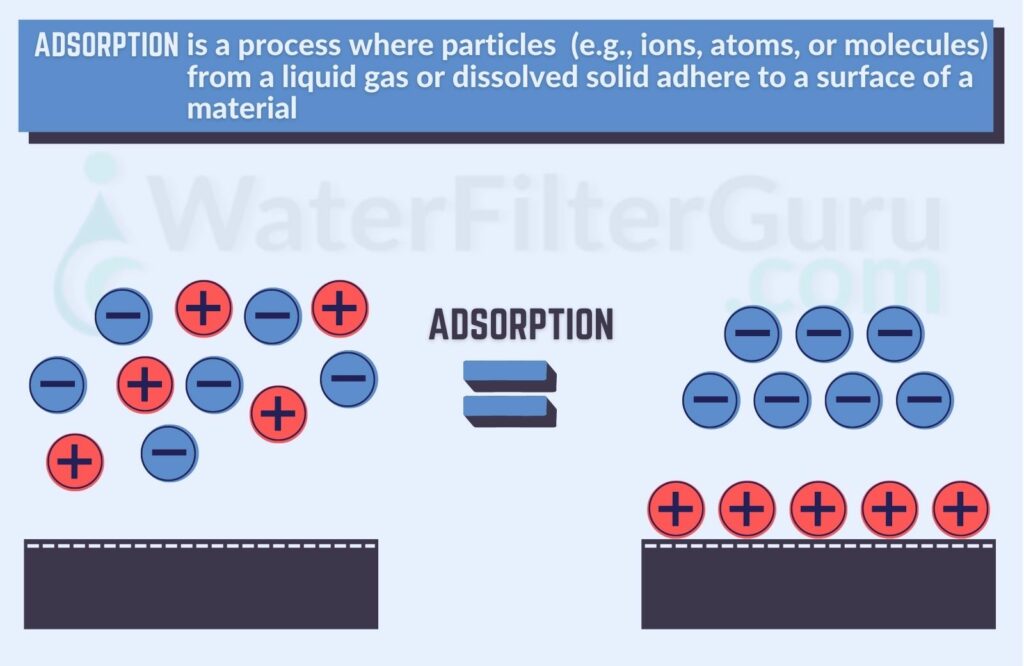
This type of filtering cartridge uses a process known as adsorption to trap particles in its pores. An RO system feeds water through a carbon filter, and contaminants stick to its surface and are unable to pass through. While carbon filters are best if you’re looking to remove chlorine and chloramines – thereby improving water’s taste – they also remove some heavy metals.
3. Reverse Osmosis Membrane
After passing through two filtration stages, water is now clean enough to taste the difference. But there are many contaminants that can’t be removed by a typical sediment or carbon filter – and that’s where the reverse osmosis membrane comes in.
There are hundreds of trace contaminants in both city and well water sources, and reverse osmosis membranes can remove near enough all of them. These contaminants include fluoride, arsenic, radium, calcium, sulfate, magnesium, pharmaceuticals, nitrate, and potassium.
4. Post or Polishing Filter
The final stage of a reverse osmosis system is the post-filter, or polishing filter. Just in case any small contaminants had managed to pass through the reverse osmosis membrane, the post-filter should get rid of them.
If you have a reverse osmosis system with a water storage tank, the post-filter will be placed after this tank, removing any bacteria that water may have accumulated while sitting in the tank before drinking. This filter is usually a form of carbon, such as coconut carbon.
Share This Image on Your Site
⚖️ Is a Reverse Osmosis System a Good Investment?
For most people, buying a reverse osmosis system is a good investment for the following reasons:
- It’s one of the most advanced, thorough water treatment options. Reverse osmosis achieves the best-quality water compared to all other types of water filters.
- It helps you save money. Although the upfront cost of a reverse osmosis system is higher than a more basic filtration system, the long-term costs of owning this system are still much lower than the costs of buying filtered water from the store.
- It’s easy to maintain. The reverse osmosis process is automated, so all you need to do is replace the filters.
- It keeps you safe. Reverse osmosis is one of the only filtration methods that can remove bacteria, keeping you safe if your water supply becomes compromised.
When Isn’t Reverse Osmosis the Right Investment?
Just because reverse osmosis is one of the best water treatment options around, that doesn’t mean it’s right for you. Some of the potential reasons why you shouldn’t invest in a reverse osmosis system are:
- You don’t mind drinking certain contaminants in your water. If you just want to remove chlorine and lead, but you’re not bothered about nitrates, VOCs, pharmaceuticals, and other impurities, you should consider a more basic water filter.
- You don’t have the budget. If you can’t, or don’t want to, splash out on a reverse osmosis system, you’re best looking at affordable alternatives, like water pitcher filters.
- You don’t want the hassle of replacing the filters. In this case, consider a tank-based filtration system that has long-lasting media, like some carbon and KDF systems.
🔩 What Are The Components Of A Reverse Osmosis System?
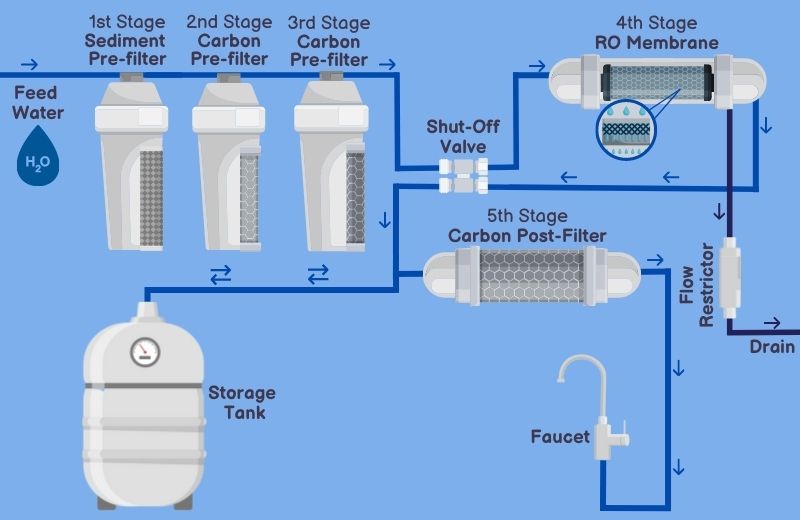
There are many parts of an RO water purifier:
Filters
A reverse osmosis system couldn’t operate without its filters, such as carbon and sediment filters,
RO membrane
The RO membrane gives reverse osmosis systems their name, and consists of tiny pores that only allow water molecules through.
Filter housing
To protect the filters and RO membrane from the world outside, filter housing is used to encase the entire system.
Bypass valve
The majority of RO systems come with an included bypass valve, or shut-off valve, which diverts water away when you’re performing system maintenance, such as changing the filters.
Backflow prevention valve
Water is sent through a reverse osmosis water filter at a high pressure, and if backflow occurred, it could damage the bypass valve. The backflow prevention valve, or air gap faucet, lets out backwashed water to prevent damage.
Drain
You can’t install a reverse osmosis system without a drain line. When water is sent through the reverse osmosis membrane, contaminants begin to accumulate inside the RO chamber. Water leaves via a drain line to remove these contaminants during filtration.
Flow Restrictor
A flow restrictor prevents excess water from being wasted due to poor flow. The flow restrictor usually comes with a pressure pump that keeps water pumping through the system at the desired pressure.
Water storage tank
Purified reverse osmosis water is sent into a holding tank, which keeps it pressurized until you turn on your faucet. When a faucet is opened, pressure forces water straight to the faucet.
Keep Reading: How to pressurize a reverse osmosis tank
Faucet
Finally, it’s common for reverse osmosis filtration systems to come with an included faucet, which won’t leach heavy metals into your water thanks to its lead-free design.
🏡 Where are Reverse Osmosis Systems Installed?
Reverse osmosis systems are installed at three main locations in the home:
Under the Kitchen Sink
Under-sink reverse osmosis systems are the most common. These systems are hooked up to your cold water supply and provide top-quality drinking water, This type of system can usually also be connected to your refrigerator or icemaker.
Tank-based or Tankless System?
Tank-based and tankless system types are available for under-sink applications. Both provide purified water from your cold water line, but tank-based units use a large storage tank and provide RO water on demand, while tankless RO systems require more patience – the before water ser needs to wait for the purification process before they have access to clean water.
On the Countertop
Countertop RO systems are freestanding units that produce batches of purified water. These systems require virtually no installation, but because they’re not hooked up to a water line, they use electricity to power water through the filter stages. Countertop RO systems need to be manually topped up with water to provide a consistent supply of filtered water.
At the Water’s Point of Entry
Point of entry reverse osmosis systems are the largest-scale systems available for at-home use. These systems are installed at the main waterline, as close as possible to its entry into your home, upstream of the water heater. The obvious advantage of whole-home reverse osmosis systems is that they filter your entire water supply, but they also waste much more water than point of use systems.
🚫 Where Shouldn’t You Install RO Systems?
We don’t recommend RO systems for:
- Showers – a simple chlorine-removal filter system will improve the quality of your shower water without affecting water flow.
- Pools – you don’t need RO purified water in a swimming pool. The process would waste far too much water to be a viable option.
- Apartments – most landlords don’t allow RO systems to be installed at the waterline, although you could use a portable countertop unit.
📈 What Affects the Performance of an RO System?
Water Pressure
Water pressure might just be the most important factor of all when it comes to the operation of an RO system. If your water pressure is too low (below 40 PSI), it won’t pass through your RO system at a fast enough rate, which means it’ll be inefficient and waste a lot of water.
60 PSI is optimal for a reverse osmosis filtration system – you can use a pressure gauge to measure your water pressure if you’re unsure. If your water pressure is lower than this, just make sure you buy an RO system that comes with an included pressure pump, or buy a pressure pump separately.
TDS type & Quantity
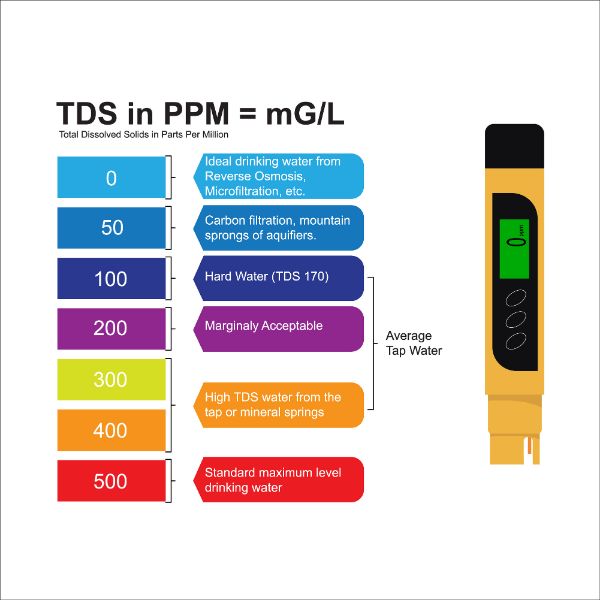
All water sources are different, and there are multiple factors that affect the TDS level of your water – your region, whether you use city or well water, and so on. TDS, or total dissolved solids, is a measure of how much organic and inorganic matter your water contains. Common total dissolved solids are chloride, potassium, sulfate, magnesium, and calcium.
You can measure your water’s TDS using a TDS meter. Drinking water usually has a TDS of between 200 and 600 PPM, and a reverse osmosis system can usually reduce PPM to about one-tenth of its original PPM (so water with a TDS rating of 300 PPM would be reduced to around 30 PPM).
A TDS reader can tell you your TDS level, but it can’t tell you exactly the types of total dissolved solids you have in your water. The best way to learn this is to check out your local water quality report (if you use city water) or send off your water to a lab for thorough testing.
Temperature of Water
If your water temperatures drop in the winter and rise in the summer, they may be responsible for the changing efficiency of your RO system. With a higher water temperature, water is thinner (a less concentrated solution), speeding up its flow rate through the semi-permeable membrane. Equally, with a lower water temperature, it’s thicker (a highly concentrated solution), which slows down the rate at which water flows through the semi-permeable membrane. Even when pressure is applied, this may affect the performance of a system.
If you notice that your system appears to be less efficient in winter months, the reduced water flow is most likely a result of your water temperature – so hold off before you assume your semi-permeable membrane has worn out and buy a replacement.
System & Filter Quality
The quality of your RO system overall affects its performance. A high-quality system with strong, durable components is more likely to not only remove a greater level of total dissolved solids from water, but also do it at a faster rate and waste less water.
Price and quality are usually linked, so think twice before you consider investing in a deal that seems too good to be true, as it probably is. Check out customer reviews if you want to see whether a manufacturer’s claims live up to reality when customers use the product in their day-to-day lives.
📑 Reverse Osmosis Water Requirements
To work optimally, a reverse osmosis system should only filter water within specific parameter ranges.
Some RO membranes are made from TFC – thin film composite. These membranes allow for a high production capacity, although they don’t have a high chlorine tolerance.
The operating requirements for TFC membranes are:
| Chlorinated? | No |
| Temperature | 40° – 100° F |
| Pressure | 30 – 100 psi |
| pH Range | 3.0 – 11.0 |
| Turbidity | < 1.0 Net Turbidity |
| Maximum TDS | 2,000 mg/L |
| Hardness | < 350 mg/L |
| Iron | < 0.05 mg/L |
| Hydrogen Sulfide | 0.00 mg/L |
| Manganese | 0.00 mg/L |
Other RO membranes are made from CTA – cellulose tri-acetate. These membranes are best suited to treating chlorinated water, but they have a lower production capacity than TFC membranes.
The operating requirements for CTA membranes are:
| Chlorinated? | Yes |
| Temperature | 40° – 90° F |
| Pressure | 30 – 100 psi |
| pH Range | 4.0 – 8.0 |
| Turbidity | < 1.0 Net Turbidity |
| Maximum TDS | 1,500 mg/L |
| Hardness | < 350 mg/L |
| Iron | < 0.05 mg/L |
| Hydrogen Sulfide | 0.00 mg/L |
| Manganese | 0.10 – 10.0 mg/L |
If your water parameters aren’t suitable for reverse osmosis, you’ll need to install a pre-treatment system to prevent damage and early degradation of the RO membrane.
💦 How Much Water Does Reverse Osmosis Waste?
Traditionally, an RO system has a 1:4 purified water to wastewater ratio, meaning that for every 1 gallon of filtered water produced, 4 gallons are wasted. This seems like quite a lot, but remember that this water is only going to be wasted when the machine is in use – so, for the ten or so seconds you spend filling up a pitcher or glass.
Most RO water systems are now much more efficient, and have a 1:3 or a 1:2 pure water to wastewater ratio. Some even have a 1:1 ratio, meaning that for every gallon of fresh water for drinking that’s produced, only one gallon is wasted. Reverse osmosis couldn’t work without some water waste, unfortunately, but some RO systems cycle water around the system multiple times before disposing of it, which is more efficient.
How to Reduce Water Waste in an RO Water Filter
Although you can’t prevent water waste altogether, there are several things you can do to reduce the amount of water wasted by your RO water filtration system:
- Install a permeate pump, which ensures consistently adequate pressure and sends water at a stronger force through the membrane, improving system efficiency.
- If you buy a tank-based reverse osmosis system, look for one with an automatic shut-off valve, which shuts off water to the tank when it’s full.
- Make use of the reject water. It’s safe to use in your garden.
☣️ What Does Reverse Osmosis Remove?
Thanks to the effective semipermeable membrane, reverse osmosis filters remove nearly 100% of total dissolved solids from drinking water. These contaminants include:
- Chemicals and metals (e.g sodium, copper, chloride, chromium, arsenic, lead, fluoride, magnesium, potassium, sulfate, nitrate, radium, calcium, phosphorous, PFAs)
- Protozoa (e.g Cryptosporidium, Giardia)
- Bacteria (e.g Salmonella, Campylobacter, E. coli, Shigella)
- Viruses (e.g Hepatitis A, Enteric, Norovirus, Rotavirus)
- Pharmaceuticals (e.g bisphenol-A, caffeine, antibiotics, opiates, and other contaminants)
It’s easier to talk about what RO doesn’t remove: some pesticides, volatile organic chemicals (VOCs) and solvents.
Percentages of Contaminants Removed
The table below highlights some of the most common tap water contaminants and their percentage removal with reverse osmosis:
| Contaminant | Removal Rate |
|---|---|
| Chlorine | 98% |
| Lead | 98% |
| Fluoride | Up to 92% |
| Nitrates | Up to 75% |
| Arsenic | Up to 96% |
| Mercury | Up to 98% |
| Sulfate | Up to 98% |
| Nickel | Up to 98% |
| Pesticides | Up t0 99% |
🆚 RO Water Vs Bottled Water
RO purified water is often sold by bottled water brands. Filtering your own water from home means you can save money and reduce your single-use plastic use – and in many cases, your water is cleaner and safer than water from the bottle.
RO tap water is highly purified water that’s available on demand. You don’t have to stock up on water or make weekly grocery runs when you have an RO system at home.
🪨 Do Reverse Osmosis Systems Remove Minerals from Water?
The reverse osmosis semipermeable membrane doesn’t just remove the bad stuff from water – it also removes healthy minerals like calcium and magnesium, causing some debate as to whether it is bad for you or not.
These minerals are often found in indigestible states in water, so it doesn’t make much difference when they’re removed. The best source of these minerals is food, so you won’t miss out by filtering them out of your water as long as your diet is healthy and varied.
How to Add Minerals to Reverse Osmosis Water?
Reintroducing minerals into RO water, and improving water quality overall, is usually straightforward.
Remineralizing Filters
If you buy an RO system that comes with an alkaline remineralization filter already included, there’s no work needed on your part. You’ll just need to change the filter cartridge as advised in the user manual (usually once every 6 to 12 months). Alkaline filters add a quantity of minerals to drinking water before it leaves your tap. Alternatively, you can use a separate alkaline water filter to accomplish this.
Trace Mineral Drops
Trace mineral drops are the cheap and convenient option if you don’t have an RO system that comes with a remineralizing filter. These drops work very similarly to remineralization filters, improving the quality of tap water by introducing a host of beneficial minerals. The only difference is that you have to add them to your water yourself once you’ve filled your glass.
👍 Benefits of Reverse Osmosis Systems
Improved water taste
Water reverse osmosis systems greatly improve the taste of tap water by removing the contaminants that are to blame for poor taste (namely chlorine, lead, and sulfur). You won’t need to buy bottled water when you use an RO system.
Long-term penny-saving
While reverse osmosis water systems are expensive to buy upfront, they can help you to save money in the long run. Instead of having to buy bottled water for its improved taste and mineral content, you can get the same benefits from RO remineralized water per day.
If you haven’t worked out how much you spend on bottled water every year, do it now. It’s easy to see how much money you can save simply by switching from bottled water to reverse osmosis drinking water from your own tap.
Healthier, cleaner tap water
The drinking water that comes out of our faucets contains a range of unhealthy contaminants, including chlorine, bacteria, and heavy metals. When you purify your drinking water using RO systems, you have the peace of mind that it’s much healthier and cleaner for you and your family.
More effective than other water systems
RO systems provide a water filtration process that’s one of the best in the industry. If you’re looking for bottled water quality, you might not achieve it from a single water filter. But with water reverse osmosis, which removes a high concentration of contaminants, you can achieve the cleanest, purest drinking water possible per day.
Offer immediate access to water
A huge benefit of most RO systems is that they have a water storage tank, which means that you get instant access to clean drinking water whenever you need it. Some water systems, such as pitcher filters, have a wait time of up to 15 minutes for access to one batch of drinking water, but reverse osmosis is immediate.
👎 Setbacks of Reverse Osmosis Systems
Although the benefits of reverse osmosis outweigh the setbacks, it’s still important to know the pros and cons of this type of filtration before you make an investment. Some of the notable setbacks of reverse osmosis water filters are:
- They’re more expensive than other types of filters. Even under-sink RO systems cost around $300 or more.
- They require more maintenance than other filter types. There are usually three or four separate filters that need replacing annually.
- They waste water. While the best reverse osmosis systems are designed to conserve water as much as possible, the RO process still results in water waste.
- You might need to pre-treat or post-treat your water when using reverse osmosis, which costs extra.
- Can cause water to become more acidic and corrosive.
Compare RO systems with other types of water treatment:
- Reverse osmosis vs distillation
- Ultrafiltration vs Reverse Osmosis
- RO vs water softeners
- Berkey vs RO
👐 Are All Reverse Osmosis Filtration Systems the Same?
The short answer is no. There are so many factors that can make a water reverse osmosis system unique from other reverse osmosis systems: quality of RO membranes, materials used in sediment and carbon filtration cartridges, wastewater ratio, storage tank capacity, and additional handy accessories, such as a pressure pump, to name a few.
For that reason, it’s important to do two things before looking at reverse osmosis water systems to buy. First, make a list of the features you’re looking for in a filtration system for your home. For instance, you may prioritize systems that are more efficient, or you may even prefer a tankless system that takes up less space.
Second, read reviews – both customer reviews and in-depth impartial reviews online. It’s important that you’re familiar with all the features of an RO water treatment system before you make a purchase. That way, you won’t be surprised – either positively or negatively – when you receive your RO filtration system in the post.
📅 How Long Do Reverse Osmosis Systems Last?
A reverse osmosis water treatment system itself can last for an impressively long time; virtually forever if you keep up with maintenance and replace worn-out parts.
RO membranes typically last for 2 years, though some RO membranes can even last for 4 years or more nowadays. The sediment filter, carbon block filter, and post-filter last for around 1 year, though this depends on your water source – a higher concentration of contaminants will clog membranes at a faster rate.
Maintaining an RO Water Filtration System
The best way to get the most use out of your reverse osmosis system is to perform regular maintenance. This includes:
Changing the Filters
Check the user manual for your reverse osmosis water filtration system and replace the filters as recommended. Use branded, high-quality filter replacements with long lifespans.
Sanitizing the System
When you change the filters in your reverse osmosis system, use this opportunity to sanitize the system. Buy a commercial RO membrane sanitizer for the best results.
Replacing the Parts
Over its years of operation, your reverse osmosis system will likely need replacement parts. Replace the o-rings, faucet, or storage tank as necessary to keep the water filtration system in working order.
✔️ How to Find the Best Reverse Osmosis System
To find the best reverse osmosis system, follow these steps:
- Read customer reviews. They’ll tell you whether people like you have had a good experience with the products you’re interested in.
- Read impartial, expert reviews of the best reverse osmosis systems available today to easily compare the features, pros, and cons of these systems.
- Check that the manufacturer has a long history of reliability, and ensure that the reverse osmosis system you’re looking at is backed by a good warranty.
- See if the product is NSF certified for performance, is privately tested to NSF Standards, or is made from NSF certified components.
- Assess the system’s technology and check that it’s up-to-date. Look at the system’s water production to water waste ratio. Systems with a 1:1 or 1:2 ratio are best.
🙋♀️ Frequently Asked Questions
What is reverse osmosis water?
Reverse osmosis water is water that has been treated in a reverse osmosis system. RO water is virtually pure, and free from chemicals, metals, bacteria, and other contaminants commonly found in drinking water supplies.
What are the best reverse osmosis systems?
The best reverse osmosis systems are constantly changing with the market. Brands we like are Waterdrop, AquaTru, NU Aqua, Aquasana, Home Master, and Crystal Quest. To learn about the best reverse osmosis systems available today, check out this guide.
Where do I buy replacement RO membranes?
You can usually buy them directly from the manufacturer’s website or Amazon shop – you can be assured that these membranes reverse osmosis will fit your specific RO water system, as they’ll most likely be the same membrane product as the one you currently use.
Can reverse osmosis be used to remove water hardness?
The membrane in an RO water system can effectively remove hardness ions as drinking water flows through it, but it can’t be considered a water softener. While a water softener is designed to specifically treat hard water issues, a high concentration of water hardness will most likely deteriorate the water filtration capabilities of the RO membrane at a faster rate. In fact, if you have particularly hard water, many manufacturers recommend installing a water softener before your reverse osmosis system, which will protect every stage of the water filtration process and ensure each filtering cartridge and membrane has the longest lifespan.
Is reverse osmosis the best solution for removing chlorine?
The reverse osmosis process is certainly an effective solution when it comes to chlorine, but this level of filtration will do much more than removing chlorine and one or two other common contaminants. Consider your needs carefully before making a purchase, as it may be that, if you’re only interested in chlorine removal, you can opt for a more affordable option that removes chlorine with a more basic process of water filtration.
What’s the difference between RO and water softening?
RO is a means of producing purified water, while water softening removes hardness minerals (calcium and magnesium). An RO filter system filters water, while a water softener softens it. The two can’t be used interchangeably, and you may need a softener and an RO filter if your water is very hard.



We installed a RO tank under the kitchen sink. We flushed it twice. The water seems to be more bubbly and definitely tastes different (and it should right?). Once the glass of water sets for a couple minutes the water clears. Is that normal?
Yes, those are just tiny air bubbles. This will dissipate over time!
Does a whole house reverse osmosis system require a dedicated faucet?
No, you will be getting treated water throughout the entire home
I have recently installed a RO system under my sink with its own drinking water tap. Also my well water tested positive for coliform bacteria. I understand the RO can remove the bacteria making it safe for consumption, but is there an issue or worry i should have about bacteria build up in the RO system or filters? Thanks!
-Travis
Great question! While RO is capable of reducing bacteria, it should not be used as the primary treatment to do so! This will cause bacteria to grow within the system and RO membrane itself, compromising the filtered water.
Bacteria should be addressed at the point of entry, either with chemical or UV disinfection.
When we find white deposits on the walls of the drinking water pots. Is it a symptom of hard water?
Yes, that is likely. What you describe sounds like limescale buildup caused by hard water
Is buying a refurbished RO system from a company a good idea? Can save 40-50%.
Eh honestly I’d probably avoid it. You never know what type of water it was used with, and if there is scale buildup inside the internal plumbing and components that might cause issues.