New to water softening & hard water treatment? Our guide will tell you everything you need to know, from our water treatment experts.
Water softener systems are becoming a commonplace appliance in many households, with an estimated 25% of homeowners in the US choosing to soften their water.
Water softeners are tank-based water treatment systems that remove hardness minerals (namely calcium and magnesium) from water, preventing hard water issues like limescale.
In this guide, we’ll be sharing all the details you need to know if you’re curious about water softeners, including how they’re set up, how they work, and their benefits. If you find that water softeners aren’t right for you, we’ve also shared several alternatives to consider which can also address hard water problems.
Table of Contents
🚰 Types of Water Softeners & Conditioners
Thought there was only one type of water softener available? Fortunately not!
It sometimes feels like manufacturers are set out to confuse us with all their different water treatment options, but actually, choice is a good thing.
Each type of hard water treatment system has its own unique benefits, and when you understand the differences between them, you might just find that one system is particularly ideal for your needs.
Salt-Based Ion Exchange Softeners
Water softeners use a process called ion exchange to replace hardness minerals with sodium ions in water.
Quick science lesson: The ions involved in ion exchange (calcium, magnesium and sodium chloride) are all positively charged. Water softeners use a negatively charged resin bed that attracts sodium inside the system. When hard water flows through the softener, the calcium and magnesium ions are also attracted to the resin bed. When these ions stick to the resin, sodium releases into the water to balance the water’s electrical charge.
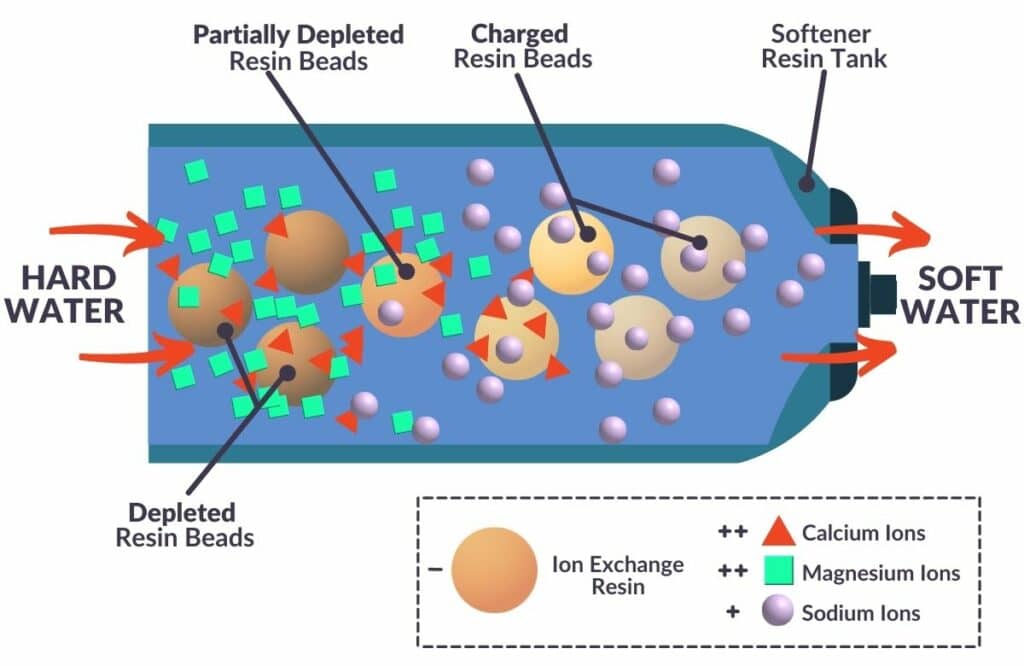
Read the long version of how water softeners work in the post.
Traditional water softeners consist of two tanks: a resin tank and a brine tank. Brine, a salt-and-water solution, flows from the brine tank into the resin tank, saturating the negatively charged resin beads with positively charged sodium ions.
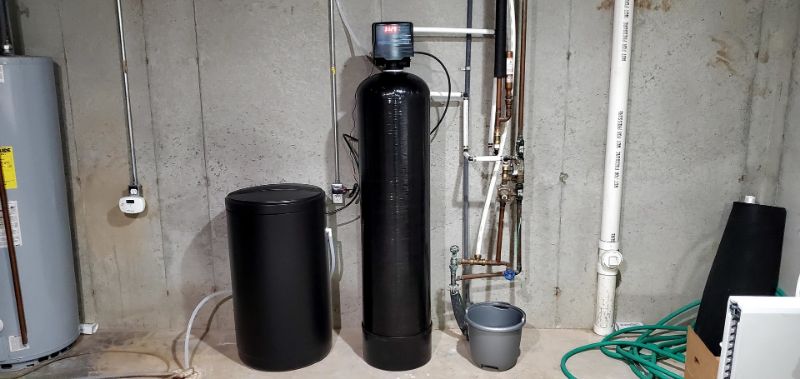
Once the sodium ions in the resin beads are depleted, the softener will regenerate, washing the hardness minerals out of the resin and replacing them with fresh sodium chloride. This process can continue consistently as long as you regularly top up the salt in the brine tank.
Water softeners are softeners, so they remove the minerals that are responsible for water hardness: calcium and magnesium.
Some water softeners can also remove low levels of iron, making them a good choice for anyone looking to soften their well water.
Water softeners aren’t filters, so they can’t remove contaminants that don’t contribute to water hardness, like heavy metals and chlorine.
Related: Diamond Crystal vs Morton Water Softener Salt Compared
Salt-Free Conditioners
There are two types of salt-free water conditioners you’re likely to come across today: TAC/NAC conditioners and citric acid conditioners.
TAC/NAC
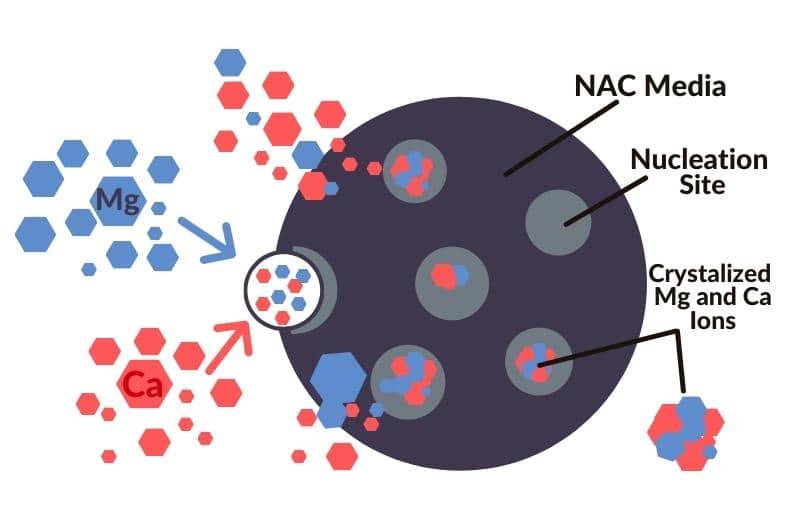
TAC/NAC (template-assisted crystallization/ nucleation-assisted crystallization) uses a media to “condition” water, preventing scale formation.
TAC/NAC water conditioners don’t remove hardness minerals or other minerals from water. Instead, these systems crystallize the hard water minerals, preventing them from being able to stick to surfaces.
The benefit of TAC is that you can still benefit from calcium and magnesium in your tap water without having to deal with limescale. You also don’t have to add salt to your water, which is a bonus if you want to limit your salt intake as much as possible.
Related: Do salt free water softeners actually work?
Citric Acid
Water conditioners using citric acid soften water using a process called chelation. Chelation meters citric acid into a hard water supply, causing the hardness ions to bind to the citric acid.
The biggest perk of using citric acid to soften your water is that you don’t have to use salt, and unlike water conditioners, chelation softeners physically remove calcium and magnesium from water.
However, it’s important to be exact with how much citric acid is added to water. Too little, and your hard water will stay hard; too much, and your water will become acidic, presenting further cleaning problems – especially if you have copper pipes.
Electronic or Magnetic Descalers
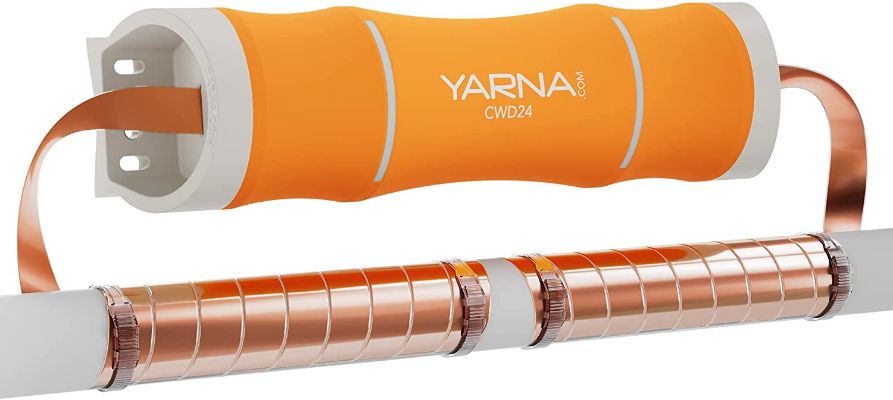
Electronic or magnetic descalers use magnets or a coil of wire placed around your main water pipe.
Like water conditioners, water descalers don’t technically soften water. Instead, these systems treat hard water by producing electromagnetic impulses that alter the composition of hard water minerals, preventing them from forming scale.
The great thing about descalers is that they’re affordable, costing around $300-$500, and they require no maintenance whatsoever. However, the evidence to back up this descaling performance is limited, so it’s hard to know whether they truly work or not. Plus, they’re not recommended for homes in a very hard water area.
Further Reading
⚙️ Components
Water softeners aren’t as complicated as you might think. There are quite a few bits involved in a softening system, but you won’t have to think about most of them once the system is installed.
The three main components to be aware of in a traditional salt-based unit are the resin tank, the brine tank, and the control head.
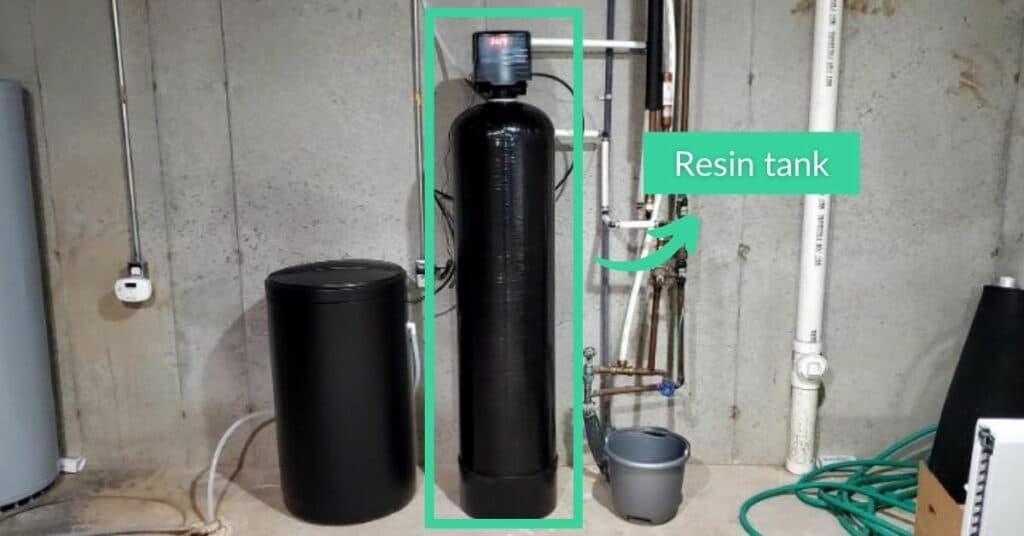
Resin Tank
The resin tank is where a process called ion exchange takes place.
Inside the resin tank are resin beads. These resin beads hold onto each individual sodium ion that passes into the tank. During the ion exchange process, the resin beads release sodium ions into the water, while calcium and magnesium minerals take their place inside the resin.
You don’t need to worry too much about the resin softener tank, as once you’ve set it to regenerate (more on that in the “control head” section), you can leave it to do its thing. Depending on the crosslink percentage of your resin, you’ll usually need to replace the resin beads every 8 to 10 years.
Brine Tank
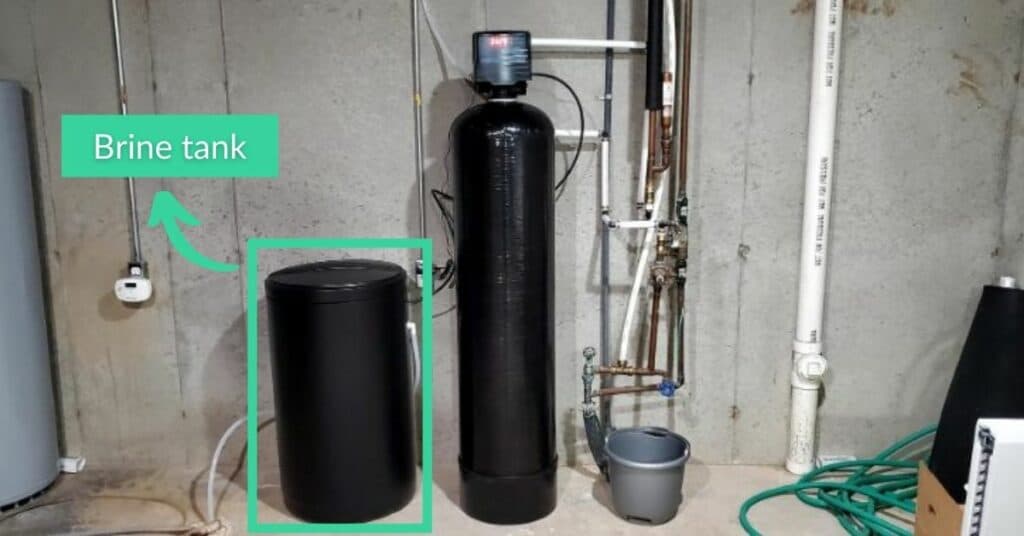
The brine tank contains the water softener salt. When this softener tank fills with water, a brine solution (combining salt and water) is formed.
This brine solution flows into the resin tank when the system regenerates.
You should keep the tank at least 1/3 of the way full to ensure there’s always enough salt in the system for the ion exchange process to take place. Check the tank every 4 weeks or so and add more salt if needed.
Check out the top rated water softener salts.
Control Head
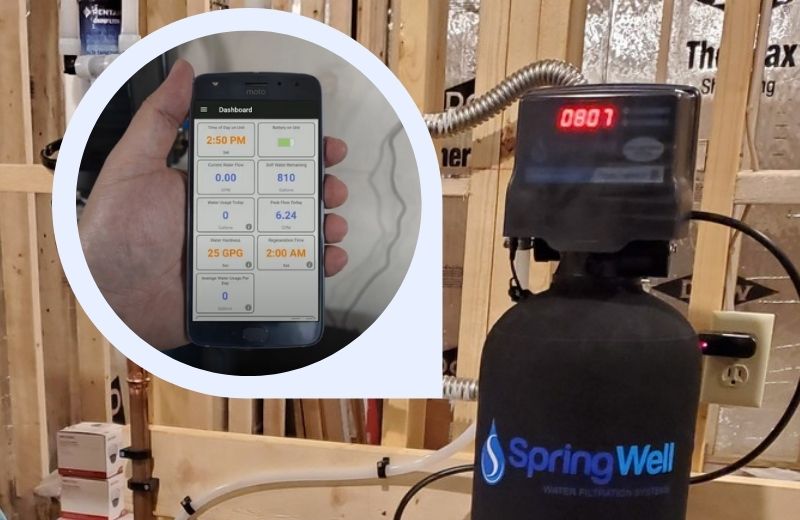
The control head gives you control over how the system operates.
You’ll be able to input important information about your water chemistry and average water usage, and program the system to perform a regeneration cycle at certain times.
Once you’ve set the system using the control head, you can leave it to automatically follow your instructions. However, if you want to improve the efficiency of your softener’s performance, it’s easy to amend your settings for more desirable results, whether that’s more water softening or reduced water waste.
Some water softeners have a Bluetooth app that lets you monitor and control your water softener from your phone, which can be a convenient option for some people.
🤔 How Does a Water Softener Work?
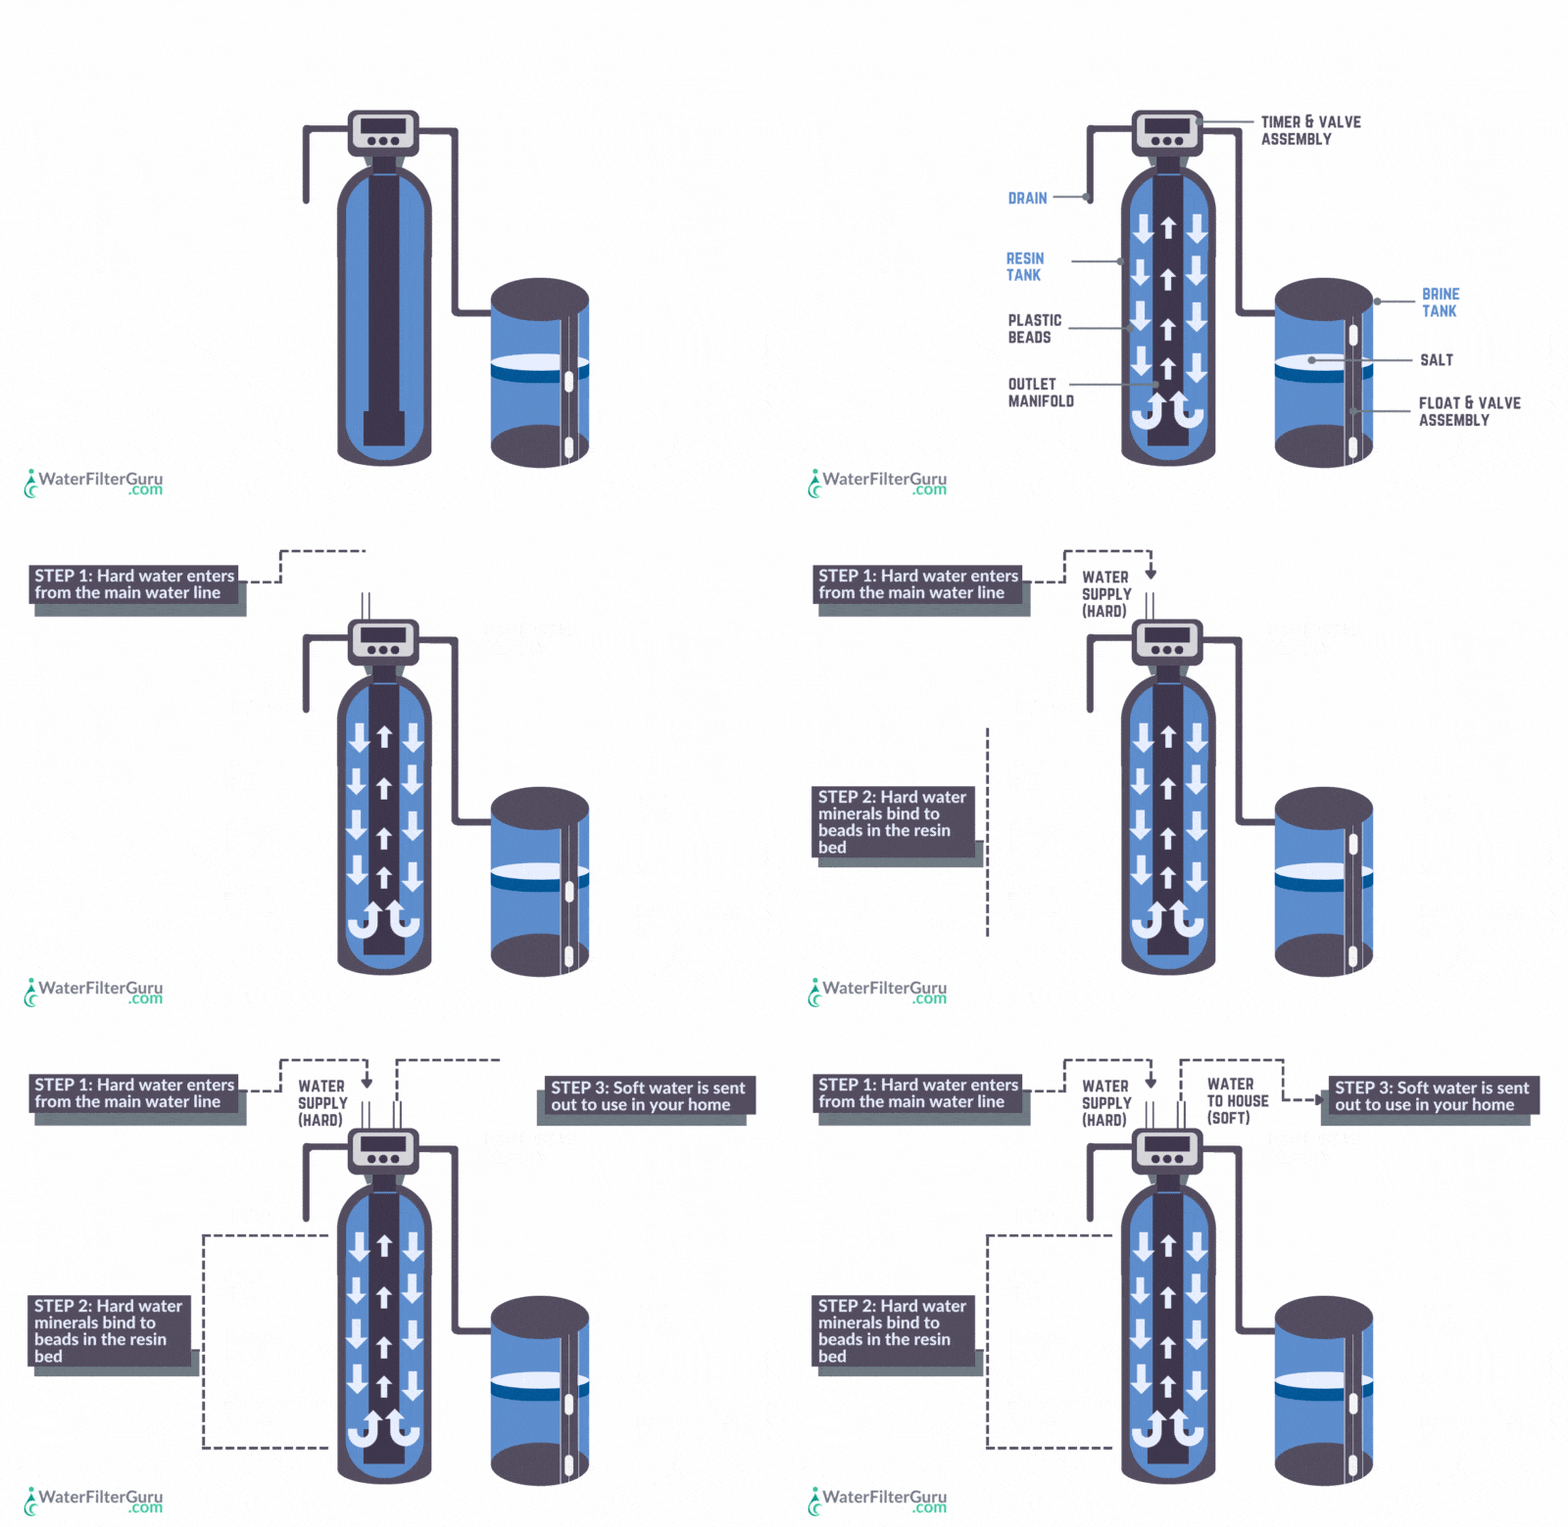
Water softeners work by using a process called ion exchange – specifically, a type of ion exchange known as cation exchange.
Here are the steps involved in this process:
- Hard water enters the water softener’s resin tank, which contains a bed of negatively charged resin beads.
- Calcium and magnesium hardness ions in the water, which have a positive charge, are attracted to the negative charge of the resin bed. As water flows through the resin tank, these mineral ions stick to the resin beads.
- Positively charged sodium chloride ions, which are loaded in the resin beads, are released into the water. Sodium is released, equal to the amount of hardness minerals captured, balancing the water’s charge.
- The water, now softened with sodium ions, leaves the water softener resin tank.
Stages Of Water Softener Regeneration
Water softeners must regenerate to replenish the sodium ions and flush away the accumulated water hardness minerals.
To regenerate, a water softener draws a highly concentrated solution of salty water (known as brine solution) out of the brine tank and flushes it through the resin beads. The process usually takes 2-3 hours in total.
There are five stages involved when a water softener regenerates:
- Brine tank fill – Water flows into the brine tank, filling to just below the salt level.
- Backwash – The resin beads are flushed in a backwashing process, removing the minerals.
- Resin tank brine draw – Brine is drawn from the brine tank and reverse ion exchange takes place.
- Brine rinse – The brine valve closes and the resin is rinsed again. Lingering brine is washed down the drain.
- Fast rinse – A final fast rinse cycle occurs in the resin, which causes the resin beads to become compacted and ready for the softening process once more.
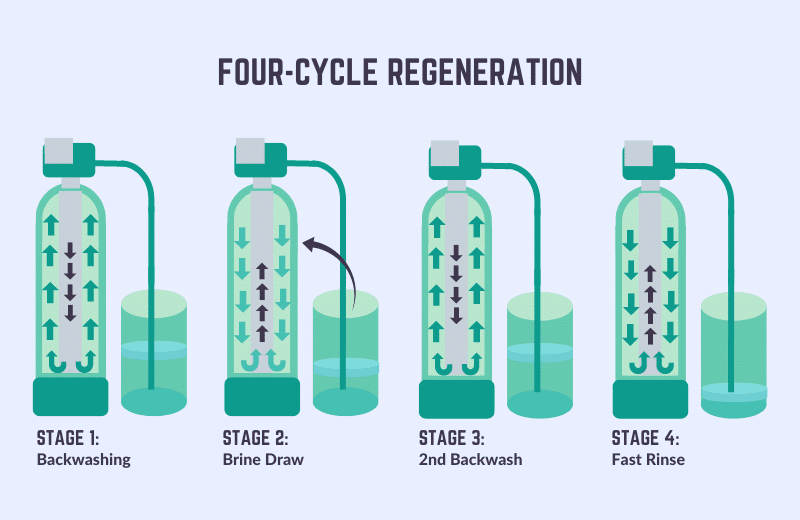
There are two common regeneration methods used in ion exchange water softeners: co-current and counter-current regeneration.
- Co-current regeneration sends the brine solution into the resin tank in the same direction as the water flow. As the brine solution flows through the resin beads, the hardness minerals are forced down through the system, causing them to constantly be exchanged and re-exchanged. Once the water reaches the bottom of the resin tank, the solution is weakened, and the resin beads with the highest charge are at the top of the tank.
- Counter-current regeneration sends brine up through the bottom of the regeneration tank. The brine solution flows in the opposite direction, first coming into contact with the bottom of the resin, which is typically less depleted than the top. There are fewer hardness minerals causing exchange and re-exchange as the brine flows through the resin, which means the brine is still relatively concentrated once it reaches the top of the tank. Counter-current regeneration distributes sodium ions more evenly around the resin, which saves about 65% water and 75% salt compared to a co-current water softener.
🆚 Upflow Vs Downflow Water Softener Systems
The four key differences between upflow and downflow water softeners are:
- The direction of flow. Upflow water softeners push brine up through the bottom of the resin bed, so the brine water flows upward towards the top of the tank. Downflow water softeners, on the other hand, send water down through the top of the resin tank, so water flows down towards the bottom of the tank.
- The efficiency of regeneration. The upflow regeneration process is about 5% more efficient than a downflow system. What does this mean? You should be able to save money and salt by using an upflow water softener.
- The thoroughness of brining. Because upflow water softeners more effectively send brine across the entire surface of the resin bed, they offer a more thorough brining process than downflow water softeners.
- The system components. While most components in upflow and downflow systems are the same, an upflow water softener doesn’t need a backwash control valve, while a downflow softener does.
Proportional vs automatic brining. Upflow water softeners are ideal when they’re used for proportional brining – when a measured amount of salt is added based on how much of the resin bed needs to be regenerated. Downflow water softeners are more commonly associated with automatic brining.
🔌 Whole House Water Softener System Configurations
You have several choices when deciding on a water softener configuration for your home:
Single Tank
Single-tank water softeners are the traditional water softener configuration. “Single tank” doesn’t mean that a water softener’s resin and brine tanks are packed into the same tank – it just means that the system has one resin tank, not two.
A single-tank system can’t provide a softened water supply when the system is performing a regeneration cycle. Most people set their water softeners to regenerate at a time that they don’t plan to use water, such as 3:00 AM, so they’ll only ever use softened water in their home.
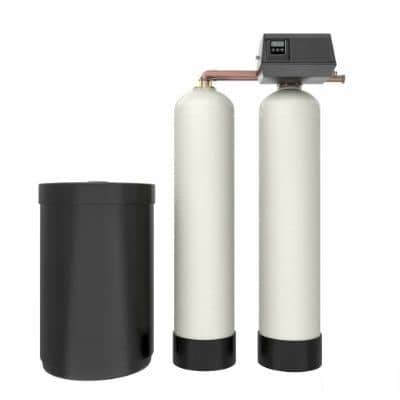
Dual Tank
Dual tank water softeners technically contain three tanks: two resin tanks and a salt tank.
The biggest perk of a dual-tank softener is that the system can always be in use. While one resin tank is regenerating, the system will switch automatically to the other tank. This means you’re never without softened water during the regeneration process.
Owning a dual-tank water softener is beneficial if you have appliances running throughout the night, such as hot water heaters.
Portable
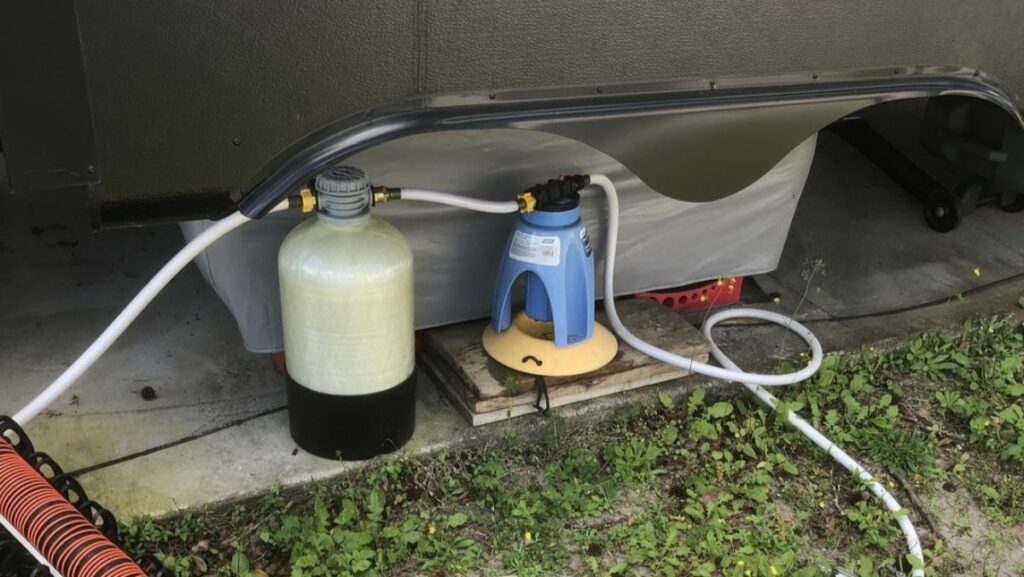
Portable water softeners aren’t actually portable, but they’re so-called because they’re much smaller than traditional water softeners.
The system configuration is the same as a single-tank ion exchange water softener. The biggest difference is that this water softener is small enough to be installed in tight locations, such as in RVs and small vacation homes.
Combo Systems
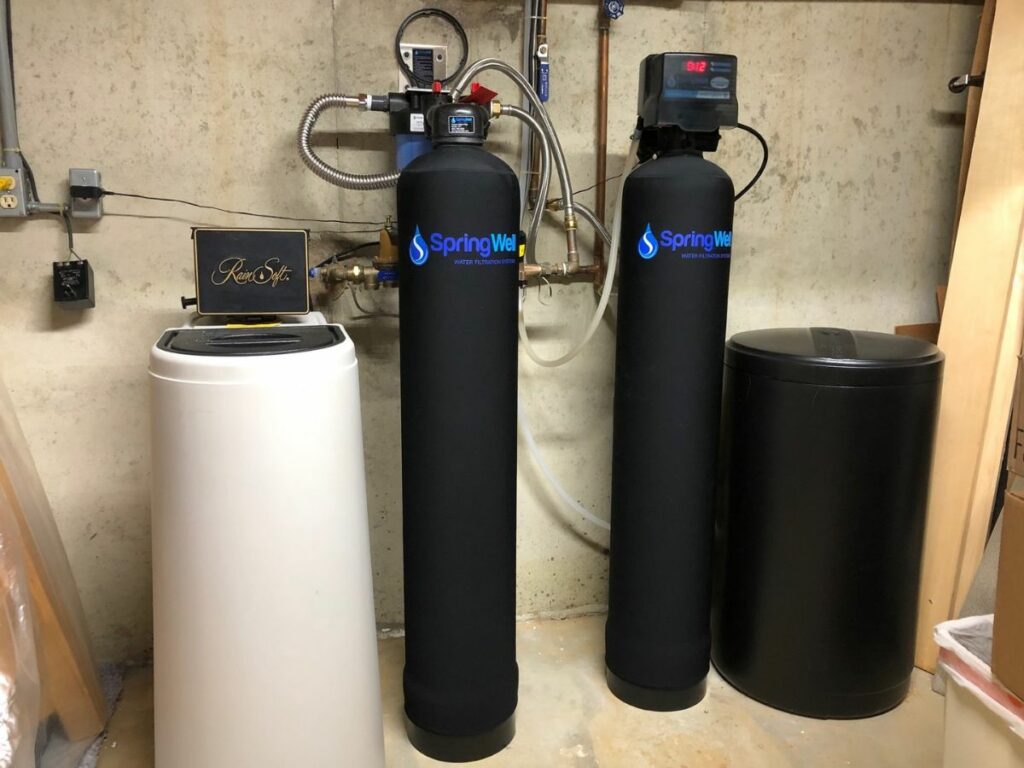
If you’re looking for the combined benefits of water softening and filtration, combo systems tend to be the most high-efficiency choice.
A combination filter-softener installed at your home’s point of entry can soften your water and improve your water quality, removing common contaminants as well as hard minerals. This means you can benefit from tastier, safer, healthier drinking water as well as reducing the scale issues in your home.
Water softener-filter combo systems usually consist of a separate water softener and a separate water filtration system that are designed to work in tandem to offer double the benefits. You should install a water softener unit before a water filtration system to prevent hard minerals from damaging the filter media.
📝 Hard Water Treatment Considerations
Before you jump into buying a water softening system for your home, there are a few things to think about. This is important – it could make the difference between buying a system that works perfectly for you, and buying a system that doesn’t work at all.
Water Hardness & Chemistry
Your water hardness is an obvious consideration to make before you invest in a water softener.
Yes, all water softener systems are designed to tackle water hardness – but the hardness of your water affects several buying decisions, including the grain capacity of a system. Some scale treatment systems simply aren’t designed for water exceeding a certain level on the hardness scale.
| Hardness | Grains per Gallon (GPG) | Parts per Million (PPM) & mg/L |
|---|---|---|
| Soft | <1 | 0 – 17 |
| Slightly Hard | 1 – 3.5 | 17 – 60 |
| Moderately Hard | 3.5 – 7 | 60 – 120 |
| Hard | 7 – 10 | 120 – 180 |
| Very Hard | >10 | >180 |
You might know already that your water is hard, but you should still test your water with a laboratory or home testing kit to find out your exact hardness in PPM.
Your water chemistry is another important consideration to make before buying a water softener, especially if you get your water from a private well.
A pH range of between 6.5 and 8 is ideal for water softening. The ion exchange process is optimal at the neutral pH range, and if your water is too acidic or too alkaline, the process may not work effectively.
Test your water’s pH using a laboratory or an at-home test kit. Consider a treatment like soda ash/sodium hydroxide injection to boost your water’s pH if it’s too acidic for proper water softening.

Additional Contaminants Present
While hard water minerals might be the most obvious water quality issue in your home, don’t assume that that’s all you’re dealing with.
If you have hard water, it’s more than likely that you’re dealing with other problems in your water supply, too.
Municipal water supplies contain traces of the following contaminants:
- Chlorine, chloramine, and disinfection byproducts
- Heavy metals like lead and arsenic
- Emerging contaminants like pharmaceuticals
- PFOA and PFOS
- Fluoride
Well water supplies are more likely to contain the following impurities:
- Iron, sulfur, and manganese
- Microorganisms like bacteria and cysts
- Sediment, tannins, and turbidity
- Radon, arsenic, and VOCs
Drinking even mildly contaminated water can have dangerous health effects, from sickness and diarrhea to long-term organ damage.
If your goal is to improve the quality of your water, don’t stop at water softening! Consider buying a water softener and filter combination to soften and filter your water, making it clean, healthy, tasty, and safe to drink.
Again, if you don’t know what your water supply contains, get it tested by a professional laboratory or use a home testing kit to find out which contaminants need to be dealt with ASAP.

Municipal Water vs. Well Water
We’ve touched on this already, but let’s make it clearer: city and well water supplies are unique from one another, and may require their own unique treatments.
Let’s look at well water first. Well water may:
- Have a high hardness content
- Contain iron
- Have an acidic pH
There are water softeners designed for well water, which can remove low levels of iron as well as high hardness.
Moving onto city water. Municipal water supplies may:
- Have high hardness
- Contain little iron
- Have a neutral pH
It’s easier to find a water softener for city water than for well water because city water doesn’t have iron or pH problems, as is more common with well water.
With that said, water hardness isn’t treated in city water before it reaches your home, meaning that your water supply may contain just as many hardness minerals as the private wells in your local area.

Local Regulations
Imagine spending thousands of dollars on a water softener, then putting hours of hard work into installing the thing – only to find out that the type of softening system you’ve bought doesn’t comply with your state’s rules.
Many local authorities have their own regulations and plumbing codes for water softeners. Things like installation, maintenance, and even regeneration drain water may be regulated by your state, so check for any local requirements before you make a purchase.
Your local plumber should be a good source of information if you’re unsure about your area’s regulations. You’re sure to get the right answers from an expert who has probably installed more water softeners than they can remember.
House vs. Apartment
Whether you own a house or apartment will probably affect the size of the water softener system you buy.
We know we’re stereotyping here, but houses are generally more spacious than apartments. An apartment might have limited room at your home’s point of entry, where the water softener should be installed. Houses tend to have more space, with a cupboard, garage, or even a basement providing the perfect location for water softener installation.
Measure out your available space before buying a water softener. Make sure there’s enough room to comfortably install and maintain the system, including topping up the salt and replacing the resin.
You need to install your softener before your hot water heater, so unfortunately, you can’t install it further down your waterline if there happens to be more space.
Owner vs. Renter
If you own your home, lucky you! You can install whatever type of water softener, wherever you want.
However, we know how many thousands of people choose to rent nowadays – whether for the flexibility of not being tied down or simply for the fact that house prices are stomach-clenchingly expensive these days.
If you rent your home, you may have a few hurdles to jump before you can buy and install a water softener.
Some landlords are cool enough to listen to your requests to make changes to your rental property – especially changes that will increase the value of a property and its appliances.
Others won’t allow you to install a water softener because of the invasive installation required. If you moved to a new home and decided to take your water softener with you, you’d leave a gaping hole in your old home’s waterline.
Check your rental terms to see if there’s any specific mention of installing water treatment systems. If there isn’t, reach out to your landlord and prepare to do some convincing. If the answer is no, you’ll have to settle for a system that doesn’t require cutting into your waterline, such as an electronic descaler.
Technology Type
There are a variety of different technology types that can be used to soften your water.
For instance, the best system for you may be a salt-based system if your water is very hard and you would rather remove all mineral ions from your water. Equally, you might not want to remove these ions, but only change their form to prevent them from producing limescale buildup, for which you might prefer one of the best salt-free softening units.
Physical Space Available to House the Unit
A traditional water softener has two tanks and takes up a fair bit of space in your home. You probably won’t be able to install a water softener inside a small cupboard. Open space is more convenient for installation and maintenance (like salt top-ups).
Salt-free conditioners are more suitable for tight spaces because they only consist of a single tank. This single tank is still quite tall, so regardless of the system you buy, you should carefully measure your available space and compare these measurements to your chosen system.
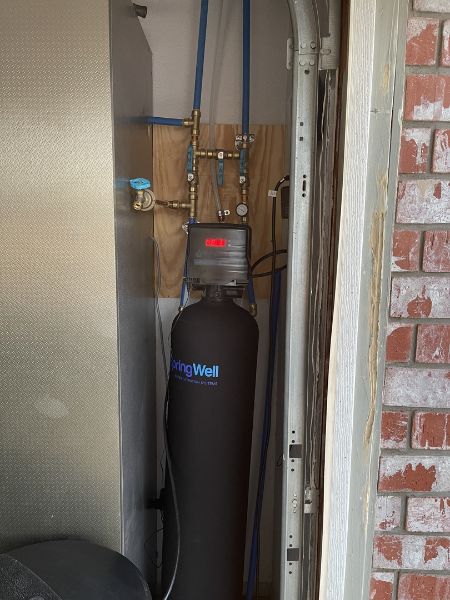
The Bypass Valve
Bypass valves are usually included in a water softener’s installation kit. A bypass valve lets you divert water around the softener for any reason – e.g. during maintenance, if the softener is experiencing problems, or you want to stop using the softener periodically.
A bypass valve is more essential than most people realize. If your water softener has a major leak and you don’t have a bypass valve, you’ll have to shut off your water supply entirely, which means your whole home won’t have access to water until the problem is solved.
If your preferred water softener doesn’t come with a bypass valve, buy a valve separately when you buy the system.
📰 Features
How much do you know about the all-important features of a water softener?
Make sure you’re aware of the following features while you’re considering the best water softener system for you:
Grain Capacity
Water softening systems on the market today vary in grain capacities from model to model. The average family will use around 3,000 grains per day. That means you’ll get around 1,960 days – or 6 years – out of a 64,000 grain water softener.
Make sure to choose the right grain capacity based on your water consumption. Most systems are available in several grain capacities for different-sized households. For instance, a 30,000 grain water softener is ideal for homes with 1-3 bathrooms, with a lower water consumption than homes with 4+ bathrooms, 50,000-grain which require a softener.
| Grain Capacity | Average Price Range |
|---|---|
| 20,000 - 24,000 | $600 - $1,000 |
| 30,000 - 32,000 | $600 - $1,500 |
| 40,000 - 48,000 | $1,000 - $2,000 |
| 60,000 - 64,000 | $1,500 - $2,200 |
| 70,000 - 80,000 | $1,800 - $3,200+ |
Resin Crosslink Percentage & Durability
A water softener’s resin has a crosslink percentage resin. This percentage, which is either 8% or 10%, tells you the durability of the resin.
A standard water softener has an 8% resin crosslink percentage. If you can afford to spend more money on a 10% crosslink resin that lasts longer, look for this feature in a water softener.
10% crosslink resins last up to 20 years, while an 8% crosslink resin has a shorter lifespan of between 10 and 12 years. The longer-lasting the resin, the less frequently you’ll need to change it to keep your softening system alive.
Flow Rate
The flow rate of a water softener is based on its capacity. Large water softeners designed for homes with 3+ bathrooms have a faster water softener flow rate than average-sized water softeners designed for 1-3 bathrooms.
Most water softeners have a flow rate of 7-12 GPM. Ion exchange doesn’t slow down water flow like a filter does, so your water pressure shouldn’t drop significantly from using a water softener. At most, you’ll need to wait a couple of seconds after turning on your faucet.
Make sure to choose the right flow rate for your home. Overcompensating with a system that’s too big can be just as damaging as using a system that’s too small. A flow rate of up to 12 GPM is ideal for most families.
Regeneration Method
All traditional salt-based water softeners need to regenerate. The resin bed holds onto sodium ions, which are used in ion exchange. When the resin runs out of sodium, the regeneration process replenishes the resin bed with sodium ions.
There are a few different ways in which a water softener can regenerate. We’ve outlined your options – and which is best – below.
- Timed regeneration is water softener regeneration set for a set time on a recurring basis (usually at 3 am, twice or three times per week). Timed regeneration means you don’t have to worry about programming the softener to regenerate yourself, and the system will regenerate when you don’t need to use water. The disadvantage of timed regeneration is that the softener will regenerate according to a set schedule, rather than when it needs to replenish the resin.
- Metered regeneration is regeneration triggered by water usage. When the water softener has used so much water, the system predicts that the resin will need replenishing, and it’ll automatically regenerate. Metered regeneration is better for avoiding salt and water waste because the system only regenerates when it needs to.
- Manual regeneration allows you to input your own timings for regeneration into the system. Being able to manually time regenerations means you can ensure the softener is out of use when you don’t need water (i.e. in the middle of the night). However, you’ll probably end up triggering regeneration when the softener doesn’t need to regenerate.
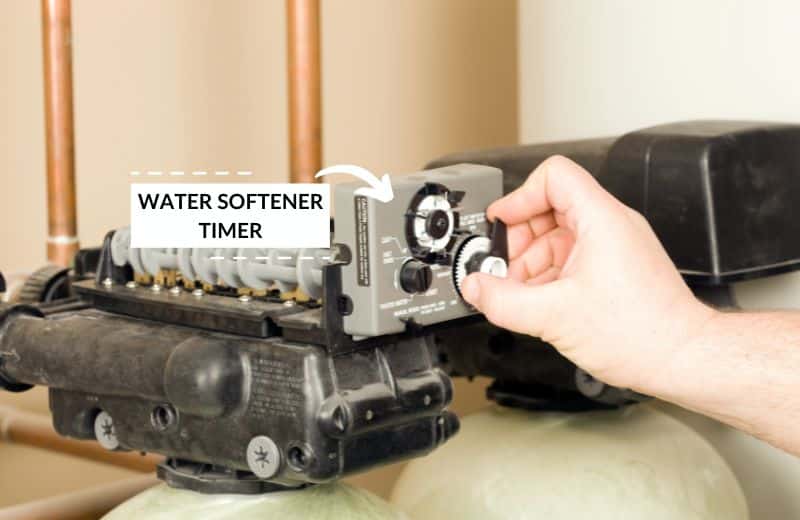
Certifications
The best sign that you can trust a water softener manufacturer is an NSF or WQA certification.
Certifications by these independent testing organizations prove that a water softener does what it’s advertised to do and meets customer demands.
Water softeners don’t need to be legally certified, but a certification works in the manufacturer’s favor, telling customers that their product can remove hard water minerals and/or iron.
At the moment, only traditional salt-based water softeners can be certified for performance. When browsing your options, look out for these certifications:
- NSF/ANSI 44 – the most important certification you’ll find for ion or cation exchange water softeners using salt or potassium chloride. An NSF 44 certification tells you that a water softener can remove hardness minerals to at least 1 GPG (grain per gallon). Systems certified to this NSF standard also meet safety and structural integrity requirements.
- NSF/ANSI 372 – softeners with this NSF certification have a lead-free construction and don’t leach metals into your water. This certification can be achieved by both softeners and conditioners because it’s based on design, not performance.
💳 Costs
So, what is a water softener priced at? Can you afford a water softener for your home? It’s something to put a lot of thought into before you make the investment.
The average cost of a water softener is $1,200-$1,800.
There are a lot of things that can affect the cost of a water softener, including:
- Whether it offers additional benefits (e.g. it can remove iron)
- Whether it offers a high-efficiency performance that helps you save water, money, and salt
- Whether it’s easy to install yourself
- Whether it has any fancy tech features (e.g. a touch screen control head or Bluetooth configuration)
- The system’s capacity (the lower-price systems have a smaller resin bed)
- The system’s size (e.g. dual-tank systems cost more)
We wouldn’t recommend paying any less than $800 for a traditional salt-based water softener. You want to make sure that your water softener works as advertised, and if you spend any less than $800, you may end up falling for a deal that’s too good to be true.
Upfront System Price
Be prepared to do some saving if you’ve decided you want a water softener for your home. The average price is $1,000-$1,500.
Water softeners are expensive, but for many people, they’re an essential investment and they pay for themselves in a few short years. This expensive upfront cost is one of the few water softener disadvantages.
The price of a water softener depends on factors like:
- System capacity – the bigger the system, the more expensive it is
- The manufacturer – more well-known brands can charge more than lesser-known manufacturers
- The system’s features – smart, efficient, money-saving features come at a premium upfront price
- Where you buy the system from – buying directly from the manufacturer is often cheaper, especially if you have an affiliate discount code
You should prepare to spend $800 minimum on a water softener – any cheaper and you’ll end up regretting your purchase.
| System Type | Average Price Range |
|---|---|
| Single Tank Ion Exchange | $800 - $2,000+ |
| Dual Tank Ion Exchange | $1,500+ |
| Salt-free Conditioners | $500 - $2,800 |
| Portable Ion Exchange | $150 - $400 |
| Commercial Systems | $2,000+ |
| Electronic/ Magnetic Descalers | $50 - $300 |
| Tanks Only | $100 |
Installation
You’ll need to consider installation costs whether you’re looking at a salt-based softener or a salt-free conditioner. Both systems require hooking up to your waterline, and you might not have the time, skills, or patience for such a big DIY job yourself.
Several factors affect this cost, including local competition and the complexity of your system. Salt-free conditioners have only one tank and no drain line, so they’re easier to install – and take less time to install – than water softeners. This makes them generally cheaper to install than salt-based systems.
It’s recommended that a professional carry out installation for POE hard water treatment systems. Here are the average price ranges of what you can expect with standard installation:
| Cost Factor | Description | Average Cost Range |
|---|---|---|
| Plumber/Handyman | Site preparation, installation of shut off valves and connectors, setting up drain line, connecting to power source and main water line | $200 - $300 |
| Equipment | Tools and equipment needed for installation, including slip joint pliers and pipe cutter | $80 - $100 |
| Supplies | Materials you need to buy separately, such as fittings, connectors, and tubing | $50 - $100 |
| Optional: Removal & Disposal | Removing and replacing old appliances legally, disposing installation debris and waste | $100 - $200 |
Maintenance
The type of technology can impact the initial as well as long-term maintenance costs of a water softener.
Salt-based softeners and salt-free conditioners are similarly priced, but salt-based softeners are more expensive to operate in the long run.
With a salt-based softener, you’ll need to pay for salt top-ups. While the cost of salt comes to less than $50 per year, it’s still $50 more than you’ll spend on a water conditioner.
| Cost Factor | Average Cost Range |
|---|---|
| Salt (ion exchange only) | $20 - $40/40 lb. bag |
| Potassium Chloride (ion exchange only) | $40 - $80/40 lb. bag |
| Resin | $100 - $150 cu.ft. |
| Water + Sewer (for ion exchange softeners) | $20 - $30 |
| Electricity | Minimal |
| Cleaner | $10 - $20 |
| Rust Remover | $5-$15 |
| Water Treatment Repairs | $200 - $1,000 |
🔩 Installation
Installing a water softening system is free – if you’re capable of doing the job yourself. Otherwise, you should prepare to factor in the cost of a professional to install your softener for you.
DIY vs. Professional
You should be able to install a water softener yourself if you’re used to doing odd jobs around the home, and you’ve preferably done a bit of plumbing work (plunging the toilet doesn’t count, sadly).
Check customer reviews to gauge how easy it is to install a system. Some manufacturers offer step-by-step videos, clear written instructions, and installation kits that are geared towards DIY installation.
Salt-free water conditioners are typically easier to install than salt-based water softeners because they only use a single tank and don’t need to be connected to a drain for the regeneration process. Magnetic treatment is the easiest to install because they sit on the outside of your water pipe.
Getting a water softener installed by a professional is the better solution if you don’t trust your ability to accurately cut into your plumbing system. The cost of professional installation for standard installation is about $200, depending on the competition in your local area.
🏪 Companies
We personally test all the water softeners featured in our guides and reviews, so we know for certain how they live up to customer expectations in real life.
There are tens of companies manufacturing water softeners today, including SpringWell, Whirlpool, SoftPro, Yarna, Fleck, AquaOx, US Water, and Crystal Quest – to name just a few. Keep in mind that not all manufacturers’ products are worth your time.
We’ve researched and reviewed products by many manufacturers on the softening and conditioning market today, but a brand’s reputation is only one of the factors that we consider when determining which softeners are the best of the bunch. How a softener performs with everyday use is just as important as the trustworthiness of the manufacturer.
- Softpro Elite review
- Springwell Futuresoft review
- Springwell SS review
📑 Summary
Buying a water softener is a big deal. You’re spending more than you would on a vacation on a single system to improve your water quality, and you need to make sure the investment is worthwhile.
There’s no denying the obvious benefits of water softeners, but not all softening systems are equal.
Do your research before buying a softener, and be careful not to fall for marketing claims. Manufacturers want you to buy their product, so they’ll try and convince you that their product is better than anyone else’s. This isn’t always true. Make bullet-point lists of a softener’s features and compare it to other systems you’re considering.
Reading customer reviews will give you a good idea of how a softening system performs in reality. You can also read impartial reviews written by experts, like the reviews found on WaterFilterGuru. We have extensive information about the best water softening systems for all manner of uses and purposes. If you need to narrow your choices down to a top 5, we’re here to help.
🧠 FAQs
How Do I Know if I Need a Water Softener?
If you have hard water, you need a water softener. Some people think that only private wells with extremely hard water need a water softener, but this isn’t true.
There are a few obvious signs that your water supply contains hardness minerals:
- Clogged faucets and shower heads
- Water flows slowly through your plumbing
- You’ve noticed scale on your faucets, coffee makers, and fixtures
- Your water-using appliances have a shorter lifespan than advertised
- You have dry skin and hair
- You need more soap than recommended in the manufacturer’s guidelines for cleaning purposes
The only way to avoid these hard water problems is to install a whole-house water softener.
If you still don’t know whether your water contains calcium and magnesium, test your water with a hardness test kit. You can buy these kits for less than $10 on Amazon, and they’ll tell you how hard your water is. From here, you can decide whether you could benefit from softening your home’s water.
Can I Install a Water Softener Myself?
Many water softeners can be installed by the homeowner – but you have to be pretty competent at DIY to consider installing a softener yourself.
There are lots of stages involved in installing a water softener, including cutting into your water line, installing the bypass valve (and checking that the bypass valve works), plumbing the tanks into your pipes, setting up the waste water line, and more.
If you’re confident in your DIY abilities, you should find it relatively easy to install a water softener, as long as you follow the user manual and instructions videos online.
If you’re not keen on DIY, you’ll be better off hiring a plumber to install your water softener for you. Most plumbers charge around $200 for standard water softener installation.
What’s the difference between a water softening system and a water filtration system?
A softener softens your water – i.e. it removes minerals responsible for hard water – while a water filter filters your water – i.e. it removes dangerous contaminants that affect the taste and quality of water. Softeners are used to tackle aesthetic problems in your home, while water filters make your water safe to drink & taste better.
Are there any alternatives to water softeners that get rid of calcium and magnesium?
You could consider installing a whole home reverse osmosis system, which can purify your water by removing total dissolved solids, removing hardness minerals in the process – but we don’t recommend it.
For one thing, reverse osmosis is costly, both because it wastes water and because it requires multiple filter changes every year. For another, high hardness levels can damage a reverse osmosis membrane, shortening its lifespan. RO units aren’t designed to be used for water softening purposes, so we’d advise sticking to softeners, descalers, and conditioners.
What’s better: salt-free conditioners or salt-based water softeners?
It depends on your own personal preferences. Both systems offer similar water treatment benefits, but while a salt-based system physically removes calcium and magnesium ions from water, a salt-free water conditioner simply prevents mineral buildup in your pipes, water heater, and water-using appliances.
If you’re trying to choose between both systems, ask yourself the following questions:
- Would I rather reduce mineral buildup or remove the cause of hardness altogether?
- Do I want to add salt to my water, even if it’s only a small amount?
- Do I want to drink healthy hard minerals in my water, or am I not bothered about this additional mineral content?
- How bad are my hard water problems? Will a water conditioner suffice?
- Does my water contain iron? Do I need a salt-based system that can also remove this contaminant?
- Am I prepared for the maintenance involved with owning a salt-based system, and how the regeneration may affect my water bill?
Ultimately, the decision is yours. Because both systems provide such similar results, and come at similar costs, we think they’re both viable solutions for hard water concerns.


What is the chemical composition of the resin beads? I live in an apartment that has a softener filtration system. I started using a water filter Pitcher for my drinking water and there’s an accumulation of little gold gels being filtered out. I don’t know how long the beads have been coming out of the faucet, and worry about how many of them I, and possibly other tenants have consumed, as well as their toxicity.
Sounds like there is ion exchange resin escaping from the system and making it into the building’s plumbing system. I would recommend contacting the building operator with your concern so the issue can be addressed at the source. The water treatment company that was contracted should be able to provide you with specific information about the exact resin used in the system